This is the same manual built into the app (⋮ menu → User Manual) —
every key on the main keypad, every Advanced screen, and every
Preferences setting, in one place.
Getting Started
Welcome to the User Manual
What it does: This manual covers every key on the main keypad (both its primary function and its green secondary function), every Advanced screen reached from the ⋮ menu, and every setting on the Preferences screen.
When to use: Browse it any time from the ⋮ menu's "User Manual" entry, or jump straight to one topic by long-pressing the button you want to know more about.
Steps
Long-press any calculator button to jump straight to its own section here, already scrolled into view and briefly highlighted.
From any other screen (an Advanced form, Preferences, History), tap the "?" button in the top bar to jump to that screen's own overview.
Use the search box at the top of this screen to find a topic by keyword, even if the word isn't in the title.
Tap the category chips to jump straight to a section of the manual without searching.
Once you're here, keep scrolling — it's one continuous document, not a separate page per topic.
Tips
The manual remembers where you left off — closing the app and reopening it, then opening the manual again with no long-press pending, picks up where you were.
Related-topic links at the bottom of a section jump you straight to that other topic.
What it does: This calculator enters and displays measurements the way a tape measure reads them — feet, inches, and a fraction of an inch — instead of forcing everything into decimal feet.
When to use: Any time you're entering a real-world measurement: a wall length, a board size, a rise or run.
Steps
Type the whole feet, then press Feet.
Type the whole inches, then press Inch.
For a fraction of an inch, type the numerator, press [/], then type the denominator — it closes automatically.
Press an operator (+, −, ×, ÷) or [=] once the value is complete.
Examples
A stud wall is 8 feet 4 and a half inches tall: 8 Feet 4 Inch 1 / 2 shows 8'-4-1/2".
A board is exactly 6 feet: 6 Feet shows 6'-0" — no inch entry needed.
Tips
You don't have to enter feet at all — 6 Inch alone gives you 6", handled purely in inches.
Pressing a unit key a second time right after itself cycles the value through Length → Area → Volume for that same unit — see the Feet and Inch key sections for the full cycle.
What it does: Tap the mic icon to speak instead of typing. On the main keypad it replays whatever it hears through the same keys your fingers would press — measurements, arithmetic, memory, and function keys, plus jumping straight to an Advanced screen by name. On an Advanced screen's own field, it only fills that field with a spoken measurement or works its Store/Recall/M+/M−/MC memory keys.
When to use: Your hands are full, gloved, or busy holding a tape measure, or it's just faster to say a measurement than type it. Useful when you need to enter multiple dimensions from a blueprint.
Steps
Tap the mic icon — on the main keypad it's in the LCD's top-right corner; on an Advanced screen it's inside each field.
The first time, allow the microphone permission Android asks for.
Speak naturally — the mic turns green while it's listening.
Say "equals" or "calculate" to finish a calculation, or just stop talking for a few seconds — either one ends listening automatically.
Tap the mic again at any time to stop it yourself.
Examples
"Five feet plus five feet equals" on the main keypad enters 5', presses +, enters 5' again, and presses = — showing 10', exactly like typing it.
"Three feet run four feet rise diagonal" presses Run, Rise, and Diag in order, the same as tapping all three.
"Stairs" (or "arc", "roofing", "history", "preferences") jumps straight to that screen, same as tapping its button.
On a Stairs (Advanced) field: "eight feet six inches" fills that field with 8'-6" directly.
"Store one"/"recall one" work the same on either keypad's own memory registers.
Tips
It's a live session, not one phrase per tap — keep talking and each part is entered as you say it, so a whole calculation can be spoken in one breath without retapping the mic between words.
If you're entering multiple dimensions (for example, from a blueprint), it's often easiest to turn the Voice Input Confirmation Chime ON. Speak one dimension and any operator (such as plus, minus, times, or divide), then wait for the confirmation chime before speaking the next value. This helps ensure each entry is recognized correctly.
A recognized command plays a short confirmation chime (turn it off in Preferences under "Voice Input Confirmation Chime"); something it couldn't understand shows an error instead, without disturbing whatever's already on screen.
An Advanced field's mic only handles measurements and memory keys — arithmetic, mode keys, and navigation words are main-keypad-only and show "Arithmetic and function keys work on the main keypad" if spoken into a field.
What it does: Every key on the keypad has a second, less-common function printed in small green text on or above it. Pressing Func once "arms" that secondary function for the very next key you press.
When to use: Whenever you want the green-labeled function instead of the key's normal white-labeled one — e.g. pressing 9 for the digit 9, versus Func then 9 for Rebar.
Steps
Press Func — it lights up to show it's armed.
Press the key whose green secondary function you want.
That key's secondary function runs instead of its normal one; Func un-arms itself automatically.
To cancel without using it, press Func a second time.
Examples
Func then Store opens Preferences instead of storing a value to memory.
Func then 8 rounds the value on screen to the nearest 1/8" instead of typing the digit 8.
Tips
Every section in this manual lists a key's secondary function right alongside its primary one — look for "Secondary function" in each key's own entry.
History
What it does: Shows the scrolling tape of every calculation you've done in the current project, in order, and lets you reuse, share, or export it.
When to use: Reviewing what you already calculated, reusing an earlier result without retyping it, or emailing/exporting a record of your work.
Steps
Open History via Func then [=], or the ⋮ menu.
Search the tape by keyword using the search box at the top.
Tap an entry to reuse it on the keypad.
Use Share or Save to export the whole tape.
Use Clear to remove this project's history.
Tips
History is per-project — switching projects switches which history you see.
What it does: Enters or calculates the Run — the horizontal leg of a right triangle (a roof's horizontal footprint under a rafter, or one side of a foundation you're squaring up).
When to use: Any time you're working a right-triangle problem alongside Rise/Diag/Pitch — common rafter length, squaring a foundation, or checking a slope.
Steps
Type a number, then press Run to enter it as the horizontal leg.
Enter any one other of Rise, Diagonal, or Pitch.
Press Diag to solve and display the diagonal (also the common rafter length).
Examples
Squaring a foundation: enter the two sides as Rise and Run, then press Diag for the diagonal you need to measure to confirm the corner is square.
What it does: Enters or calculates the Rise — the vertical leg of a right triangle (how far a roof climbs over its run, or the vertical side of a squared corner).
When to use: Alongside Run/Diag/Pitch for any right-triangle problem.
Steps
Type a number, then press Rise.
Enter any one other of Run, Diagonal, or Pitch.
Press a mode key to solve for whichever value is still missing.
Examples
A roof climbs 6 feet over a 12-foot run: 6 Rise, 12 Run, then Pitch shows 6/12.
What it does: Enters or calculates the Diagonal — the hypotenuse of a right triangle. For a roof, this is the common rafter's own point-to-point length (no overhang or ridge adjustment included). Pressing it again after it's solved cycles to the plumb and level cut angles.
When to use: Squaring up a foundation or deck (3-4-5 rule), or finding a common rafter's length once you know the run and either the rise or pitch.
Steps
Enter Rise and Run (or Run and Pitch).
Press Diag to display the diagonal / rafter length.
Press Diag again to cycle to the plumb cut angle, then again for the level cut angle.
Examples
Squaring a 12' x 16' slab: 12 Rise, 16 Run, Diag reads back the exact diagonal both corners should match.
A 6/12 roof over a 14' run: 14 Run, 6 Pitch, Diag gives the common rafter length; press Diag again for the plumb cut to mark the ridge end.
What it does: Enters or calculates the roof's Pitch — how many inches it rises for every 12 inches of run. Secondary function Slope enters or displays the same value as a decimal ratio (e.g. 0.5) instead of "X in 12".
When to use: Describing or entering how steep a roof is, in whichever form your plans or a supplier gave it to you — inches-per-foot, degrees, percent grade, or ratio.
Steps
Type a number (e.g. 6 for a 6/12 pitch), then press Pitch.
Press Pitch again (with nothing typed) to cycle the same value through degrees, percent grade, then slope ratio, then back to inches-per-foot.
For Slope directly: Func then Pitch enters/shows the decimal ratio form.
Examples
A supplier quotes a roof as "0.5 slope": Func Pitch 0 . 5 Func Pitch enters it, then plain Pitch presses cycle it to 6/12, then to its angle in degrees.
Tips
An entered pitch stays stored permanently (survives turning the app off); a calculated pitch does not — it resets on Clear.
Secondary function: Slope — the same value as a decimal ratio.
What it does: Calculates a regular (45°) hip or valley rafter's length and cut angles from the Rise/Run already on file. Secondary function Polygon opens the Polygon (Advanced) screen for regular polygon layout math (gazebos, octagon decks).
When to use: You've already entered Rise and Run (or Pitch) for the main roof and need the hip or valley rafter that meets it at 45°.
Steps
Enter Run and Rise (or Run and Pitch) using the Run/Rise/Pitch keys.
Press Hip/V to display the hip/valley length.
Press Hip/V again to cycle through plumb, level, and side cut angles.
Examples
A 6/12 roof, 14' run: after entering Run/Pitch, Hip/V gives the 45° hip rafter's length and cuts for that corner.
Tips
For an irregular (unequal-pitch) hip/valley, use the Roofing (Advanced) screen instead — this keypad version only covers the regular 45° case.
Secondary function: Polygon — opens the Polygon (Advanced) screen.
What it does: Enters or calculates a circle's Circumference, and cycles through its full geometry. Secondary function Column extends the same circle into a 3D column or cone volume once a height is on file (via Height).
When to use: Any round layout — footings, columns, circular decks, pipe or tube sizing.
Steps
Type a diameter and press Circle (or enter a radius or circumference on file first).
Press Circle again to cycle through diameter, radius, area, and circumference.
For a column/cone: also enter a Height, then Func then Circle cycles through column and cone volume/surface area too.
Examples
A 24" round footing: 24 Inch Circle gives the circumference; press again for the area to order concrete.
A 12"-diameter, 8'-tall column: 12 Inch Circle, 8 Feet Height, then Func Circle gives the column's volume.
Tips
Secondary function: Column — cycles column/cone volume and surface area.
What it does: Applies a percentage to the value on screen (markup, discount, or a percentage of a total). Secondary function x² squares the value on screen.
When to use: Adding a waste factor or markup to a material total, or finding a percentage-grade slope.
Steps
Enter or calculate a value.
Type the percentage, then press %.
For x²: enter a plain number, then Func then %.
Examples
Adding 10% waste to a 500 sq ft material order: 500 × 1 1 0 % gives the total including waste (depending on whether it's chained after a × or used standalone, it applies as a straight percentage of the value shown).
Squaring a value for an area calc: 8 Func % gives 64.
Tips
Secondary function: x² — squares the displayed value.
Func
What it does: Arms the next key's secondary (green-labeled) function. This key has no secondary function of its own — pressing it twice in a row just cancels the arm.
When to use: Any time you want a key's green-labeled function instead of its normal one.
Steps
Press Func.
Press the key whose secondary function you want.
Tips
See "The Func Key (Secondary Functions)" in Getting Started for the full explanation.
What it does: A tap backspaces one character from the entry on screen. Long-pressing it clears the entire current entry at once. Secondary function √x finds the square root of the value on screen.
When to use: Fixing a typo (tap) or starting a fresh entry immediately (long-press).
Steps
Tap Clear to remove the last character typed.
Press and hold Clear to wipe the whole current entry.
For a square root: enter a value, then Func then Clear.
Examples
Finding the side of a square with 144 sq ft of area: 144 Func Clear gives 12.
Tips
This is the one key whose long-press does NOT open this manual, since it already has its own long-press function.
Secondary function: √x — square root.
Length / Width / Height
Length
What it does: Enters or calculates a Length. Pressing it again right after itself cycles the value through Length → Area → Volume. Secondary function Blocks starts a concrete-block or brick takeoff.
When to use: Any linear dimension — a wall run, a piece of stock, one side of a room.
Steps
Type a number, then press Length.
Press Length again (nothing typed in between) to cycle Length → Area → Volume of the same value.
For a block/brick takeoff: Func then Length, then enter the wall's length and height.
Examples
A 20-foot wall: 20 Feet Length shows 20'-0"; pressing Length again shows the same 20' squared as an area.
Tips
Secondary function: Blocks — concrete block/brick count for a wall.
What it does: Enters or calculates a Width, alongside Length for an area. Pressing it again right after itself cycles Length → Area → Volume the same way Length does. Secondary function Footing starts a concrete footing takeoff.
When to use: The second dimension of a room, slab, or panel, once Length is entered.
Steps
Enter a Length first.
Type a number, then press Width — the area of Length × Width is calculated.
For a footing takeoff: Func then Width, then enter the footing's length.
Examples
A 12' x 10' room: 12 Feet Length, 10 Feet Width gives 120 sq ft.
What it does: Enters a Height, completing a wall or room volume once Length (and optionally Width) are on file — cycles through wall area, room area, and volume. Secondary function Sheets starts a drywall sheet-count takeoff.
When to use: Finishing off a wall or room calculation, or extruding a circle (via Circle) into a column.
Steps
Enter Length (and Width, for a full room).
Type a number, then press Height.
Press Height again to cycle through wall area, room area, and volume.
For drywall sheets: Func then Height, then enter the area to cover.
Examples
A 20' wall, 8' tall: 20 Feet Length, 8 Feet Height gives the wall's square footage.
A 12x10 room, 8' ceilings: 12 Length, 10 Width, 8 Height cycles to the room's volume.
Tips
Secondary function: Sheets — number of 4x8/4x9/4x12 drywall sheets.
What it does: Adds the value on screen to the cumulative memory total. Secondary function M− subtracts it instead.
When to use: Building a running total across several separate calculations — several room areas you're adding up toward one material order, for example.
Steps
Calculate a value.
Press M+ to add it to memory (or Func then M+ to subtract it).
Press Recall twice to see the running total at any point.
Examples
Three rooms' worth of flooring: calculate each room's area, pressing M+ after each one, then Recall twice for the total square footage to order.
Tips
Secondary function: M− — subtracts from the memory total.
What it does: Stores the value on screen into register 1, 2, or 3 for later recall, or overrides certain keypad defaults (target riser height, stud on-center spacing, etc. — see each function's own section). Secondary function Settings opens Preferences.
When to use: Saving a value you'll need again later in the same session without re-typing or re-deriving it.
Steps
Calculate or enter a value.
Press Store, then a digit 1-3 to pick which register.
To open Preferences instead: Func then Store.
Examples
Saving a common ceiling height for reuse: 8 Feet Store 1 saves 8' into register 1 for the rest of the session.
Tips
Secondary function: Settings — opens the Preferences screen.
What it does: Clears the cumulative memory total back to zero. On the main keypad this is Recall's own secondary function (Func then Recall); on the Advanced screens' own slide-up keypad it's a dedicated key of its own.
When to use: Starting a fresh running total with M+ without the previous total still added in.
Steps
On the main keypad: Func then Recall.
On an Advanced screen's own keypad tray: press MC directly.
What it does: Enters a value as feet, or converts the value on screen to feet. Pressed again right after itself, cycles Length → Area → Volume in feet. Secondary function cm converts to centimeters.
When to use: Entering any whole- or partial-foot measurement, or converting a value already on screen into feet.
Steps
Type a number, then press Feet.
Press Feet again right after itself to cycle the same value through sq ft and cu ft.
For cm: Func then Feet.
Examples
66 Inch Feet converts 66 inches to 5'-6"; pressing Feet again shows 5.5', then 5.5 sq ft, then 5.5 cu ft.
What it does: Enters a value as inches (or completes a feet-inches entry), or converts the value on screen to inches. Pressed again right after a fraction closes, cycles fraction → decimal inches → sq in → cu in. Secondary function mm converts to millimeters.
When to use: Entering an inch measurement, finishing a feet-inches entry, or converting between fraction and decimal inches.
Steps
Type a number, then press Inch.
For a fraction: after Inch, type the numerator, [/], then the denominator.
Press Inch again right after a finished fraction to cycle fraction → decimal → sq in → cu in.
For mm: Func then Inch.
Examples
6 Feet 6 Inch 1 / 2 Inch shows 78-1/2"; pressing Inch again shows 78.5", then 78.5 sq in, then 78.5 cu in.
What it does: Types the digit 7. Secondary function Km enters or converts a value in kilometers, the same dual enter-or-convert behavior every other unit key has.
When to use: Any long metric distance — site surveys, road/utility runs, or converting a finished result to kilometers.
Steps
To enter a value in kilometers: type the number, then Func then 7 (e.g. 2 Func 7 -> "2 km").
To convert whatever's on screen to kilometers: press Func then 7 with no fresh number typed.
Examples
A 2.5 km utility trench run: 2.5 Func 7 enters it directly in kilometers.
A distance already on screen in miles or meters: Func 7 converts it to kilometers.
Tips
Secondary function: Km — mirrors the Mile key (Func /), just metric instead of imperial.
Km behaves like m/cm/mm: it always shows as "X km" rather than splitting into feet-inches.
What it does: Types the digit 5. Secondary function lbs tags or converts the value on screen as pounds.
When to use: Any weight given in pounds — a material weight, a delivered load.
Steps
Type a number, then Func then 5.
Tips
Secondary function: lbs — pounds.
6
What it does: Types the digit 6. Secondary function tons tags or converts the value on screen as tons.
When to use: A material weight given in tons — gravel, aggregate, structural steel.
Steps
Type a number, then Func then 6.
Tips
Secondary function: tons.
×
What it does: Multiplies the running total by the next value entered. Secondary function Clear All resets everything — the display, memory, and every stored value — back to factory defaults.
When to use: Multiplying two values, or starting completely fresh with Clear All.
Steps
Enter a value, press ×, enter the second value, press [=].
For Clear All: Func then ×.
Tips
Secondary function: Clear All — use with care, it resets everything including memory and stored defaults.
1
What it does: Types the digit 1. Secondary function Acre converts the area on screen to acres.
When to use: Land or site area given in, or needed in, acres.
Steps
Calculate an area, then press Func then 1.
Examples
A 200' x 300' lot: 200 Length 300 Width, then Func 1 gives the area in acres.
Tips
Secondary function: Acre.
2
What it does: Types the digit 2. Secondary function kg tags or converts the value on screen as kilograms.
When to use: A weight given in kilograms.
Steps
Type a number, then Func then 2.
Tips
Secondary function: kg.
3
What it does: Types the digit 3. Secondary function met tons tags or converts the value on screen as metric tons.
When to use: A weight given in metric tons.
Steps
Type a number, then Func then 3.
Tips
Secondary function: met tons.
−
What it does: Subtracts the next value entered from the running total. Secondary function +/- toggles the sign of the value on screen.
When to use: Subtracting a cutout or deduction from a total, or entering/flipping a negative value.
Steps
Enter a value, press −, enter the value to subtract, press [=].
For a sign change: Func then −.
Examples
Deducting a 3' x 6.5' door opening from a wall area: calculate the wall area, then − 3 Length 6.5 Height = subtracts the door's area.
What it does: Types the digit 0. Secondary function Cost calculates total material cost from the dimension on screen and a per-unit price you enter.
When to use: Pricing out a material order once you have its quantity.
Steps
Calculate a quantity (area, volume, count, etc.).
Press Func then 0.
Enter the price per unit when prompted.
Examples
500 sq ft of flooring at $4.50/sq ft: after getting 500 sq ft, Func 0 4 . 5 0 gives the total cost.
Tips
Secondary function: Cost — total cost from a quantity and unit price.
.
What it does: Types a decimal point. Secondary function dms◄►deg converts an angle between decimal degrees and degrees-minutes-seconds.
When to use: Entering any non-whole number, or converting a surveyed angle given in degrees-minutes-seconds.
Steps
Type digits with a decimal point where needed.
For dms conversion: with an angle on screen, Func then [.].
Tips
Secondary function: dms◄►deg.
=
What it does: Completes the current calculation and displays the result. Secondary function History opens the scrolling tape of past calculations for this project.
When to use: Finishing any chained calculation (value, operator, value, [=]).
Steps
Enter a full calculation, then press [=].
To review past entries: Func then [=].
Tips
Secondary function: History — opens the History screen.
What it does: Adds the next value entered to the running total. Secondary function π enters the constant pi (3.141593).
When to use: Adding two or more values together, or when you need pi directly for a manual circle calculation.
Steps
Enter a value, press +, enter the next value, press [=] to total, or keep chaining more +/− entries.
For pi: Func then +.
Tips
Secondary function: π — the constant pi.
Stairs (Advanced)
Stairs (Advanced)
What it does: Works out a full stair layout — riser height, tread depth, number of steps, stringer length, and the floor angle — from the floor-to-floor rise and your code-max riser height and target tread depth. Also checks the stairwell opening you need for headroom.
When to use: Laying out any straight-run stair from a known floor-to-floor rise.
Steps
Enter Total rise (floor to floor).
Enter Max riser height (your local code maximum, e.g. 7-3/4").
Enter Target tread depth.
Optionally enter a Total run limit if the stairwell is only so long.
Review the riser/tread/stringer/angle results and the live diagram below them.
Enter Headroom and Floor thickness to also see the required stairwell opening.
Examples
A 9' floor-to-floor rise, 7-1/2" max riser, 10" target tread: the calculator divides the rise into the fewest risers that stay at or under 7-1/2", then gives you the exact riser height, tread depth, stringer length, and stair angle to build to.
Tips
Every field keeps exactly what you typed — the calculator never silently overwrites your target tread depth or max riser with a result, so you can keep adjusting inputs without losing track of your own targets.
Pinch to zoom the diagram for a closer look; double-tap to reset.
What it does: Divides the total rise into the fewest risers that stay at or under your code-max riser height, gives the actual riser height that results, and derives the tread depth, total run, stringer length, and true angle of incline from it.
When to use: Any straight-run stair — this is the core of the Stairs section.
Steps
Enter Total rise and Max riser height.
Enter Target tread depth (the calculator uses it as-is unless a Total run limit forces it narrower).
Read Number of risers, Riser height, Number of treads, Tread depth, Total run, Stringer length, and Angle.
Tips
Stringer Length is measured to the back corner of the top tread — where it meets the upper floor — not all the way to the landing's own leading edge, matching how a real stringer board is actually cut.
If Tread depth comes back narrower than your target, a ⚠ warning shows — it means the Total run limit you entered forced tighter treads than you asked for.
What it does: Calculates the stairwell opening length needed in the floor above so someone climbing the stairs has your required headroom clearance the whole way up.
When to use: Framing the floor opening for a new stair before the stair itself is built.
Steps
Solve the stair itself first (Total rise/Max riser/Target tread depth).
Enter Headroom and Floor thickness (both start filled in with typical defaults).
Read the Stairwell opening length and how many risers it needs to clear.
Tips
Headroom and Floor thickness start filled in with typical values (6'-8" and 10") — edit them directly for your own code or floor assembly.
The opening only grows in whole-tread steps, so the actual clearance shown is always at least your requested headroom, sometimes a little more.
What it does: The full roof-framing toolkit in one screen, as 5 independent sections: the Rise/Run/Diagonal/Pitch right triangle, Roof Materials & Covering, Hip/Valley, Jack Rafters, and Rake-Wall Studs.
When to use: Any roof-framing task more involved than the keypad's own quick Run/Rise/Diag/Pitch/Hip-V keys — irregular (unequal-pitch) hips and valleys, jack rafter ladders, material takeoffs, or gable-end rake studs.
What it does: Solves the Rise/Run/Diagonal/Pitch right triangle from any 2 known values — the same math as the keypad's own Run/Rise/Diag/Pitch keys, plus optional Ridge Beam Width and Rafter Tail Length to get the rafter's true cut length instead of just its point-to-point diagonal.
When to use: Finding a common rafter's length and cut angles, or adjusting that length for a ridge beam and overhang.
Steps
Enter any 2 of Run, Rise, Diagonal, Pitch — leave the other 2 blank.
Press Calculate to solve the other 2, plus the plumb and level cut angles.
Optionally enter Ridge Beam Width and/or Rafter Tail Length for the actual cut-to-cut rafter length.
Examples
A 12' run at a 6/12 pitch: Calculate gives the rise, the common rafter's diagonal length, and its plumb/level cut angles.
The same rafter against a 1-1/2" ridge beam with a 12" tail: entering both extra fields adjusts the raw diagonal down for the ridge and out for the tail, giving the actual board length to cut.
Tips
The Ridge Beam Width/Rafter Tail Length row updates live as you type, with no need to press Calculate again once the base triangle is solved.
What it does: Converts a flat plan (footprint) area and a pitch into the actual sloped roof area, then a full covering material takeoff — roofing squares, shingle bundles, and 4x8 sheathing sheets.
When to use: Ordering shingles and sheathing once you know the building's footprint and roof pitch.
Steps
Enter the Plan area (the flat footprint, in square feet).
Enter the Pitch.
Press Calculate for the actual roof area, squares, bundles, and sheet count.
Examples
A 1200 sq ft footprint at a 6/12 pitch: Calculate gives the true (sloped) roof area, then how many roofing squares, shingle bundles, and 4x8 sheets to order.
What it does: Calculates a hip or valley rafter's length and cut angles — Regular mode for the standard 45° corner both roof planes share the same pitch, Irregular mode for a corner where the two roof planes have different pitches.
When to use: Framing any hip or valley — Regular for a typical square corner, Irregular for an addition or dormer that meets the main roof at a different pitch.
Steps
Choose Regular (45°) or Irregular.
Regular: enter any 2 of Run/Rise/Pitch.
Irregular: enter Run, Main pitch, and Irregular pitch.
Press Calculate for the length, plumb cut, level cut, and side cut(s).
Examples
A regular hip on a 6/12 roof, 14' run: Calculate gives the hip's own length and cuts.
An addition meeting the main roof — main pitch 8/12, addition pitch 6/12: Irregular mode gives the hip's length plus the two different side-cut angles where it meets each roof plane.
What it does: Calculates the full graduating ladder of jack rafters framing into a hip or valley, at a given on-center spacing — Regular (45°) or Irregular (unequal-pitch), the same two modes as Hip/Valley.
When to use: Framing the shorter rafters that step up to meet a hip or valley.
Steps
Choose Regular or Irregular (and, for Irregular, Wall O.C. or Hip O.C. spacing).
Enter Run/Rise/Pitch (Regular) or Run/Main pitch/Irregular pitch (Irregular).
Enter the On-center spacing.
Press Calculate for the common difference and every jack's own length.
Tips
Wall O.C. spaces each side's ladder independently along its own wall; Hip O.C. spaces both along the shared hip itself instead, pairing up a matching jack on each side at every point.
"Common difference" is how much shorter each successive jack is than the one before it — every ladder is a straight arithmetic progression.
What it does: Calculates the graduating stud lengths for a gable-end wall that follows the roof's slope — each stud on-center is a little taller than the last, in a straight line up the rake.
When to use: Framing a gable end wall under a sloped roof line.
Steps
Enter the Rake run (from the short end to the tall end).
Enter the Pitch.
Enter the Start height (at the short end).
Enter the On-center spacing.
Press Calculate for the common difference and every stud's own length.
Examples
An 8' rake run at a 6/12 pitch, starting at 8' tall, 16" on-center: Calculate lists every stud's exact length, each one taller than the last by the same fixed amount.
What it does: Calculates board feet from a piece of lumber's nominal thickness, nominal width, and length — the standard way lumber is priced and ordered.
When to use: Estimating or pricing a lumber order.
Steps
Enter the Nominal thickness (e.g. 2" for a 2x4).
Enter the Nominal width (e.g. 4" for a 2x4).
Enter the Length.
Press Calculate for the board feet.
Examples
Ten 2x4s, 8 feet long: 2" thickness, 4" width, 8' length gives the board feet for one piece — multiply by 10 for the full order.
Tips
Board feet uses nominal (stated) dimensions, not the actual (smaller, planed) size of dimensional lumber.
Circle (Advanced)
Circle (Advanced)
What it does: Solves a circle's full geometry from any one known value (diameter, radius, or circumference), and — with an optional height — the volume of that circle extruded into a column or cone.
When to use: Round footings, columns, tubes, or any circular layout.
Steps
Choose which value you know: Diameter, Radius, or Circumference.
Enter that value.
Optionally enter a Height for a column/cone volume.
Press Calculate.
Examples
A 24" diameter footing: entering Diameter 24" and Calculate gives the radius, circumference, and area.
A 12"-diameter, 8'-tall concrete column: adding a Height of 8' also gives the column's volume and, at a third of that, the cone volume for the same base and height.
Tips
This mirrors the keypad's own Circle key, including its Conv+Circle column/cone cycle — see the Circle key section.
What it does: Calculates concrete volume from a slab or footing's length, width, and height/thickness — cubic feet, cubic yards, estimated weight, and total cost.
When to use: Ordering concrete for a slab, footing, or any rectangular pour.
Steps
Enter Length, Width, and Height/thickness.
Optionally enter a Cost per Yard (defaults to $150.00, and remembers the last value you set).
Press Calculate for cubic feet, cubic yards, estimated weight, and total cost.
Examples
A 20' x 20' slab, 4" thick: Calculate gives the cubic yards to order and, at your entered cost per yard, the total concrete cost.
Tips
Cost per Yard is saved automatically — it stays set the next time you open this screen, even after closing the app.
Compound Miter (Advanced)
Compound Miter (Advanced)
What it does: Calculates the miter (saw table) angle and bevel (saw blade) angle for crown molding or other angled trim, from the wall corner angle and the molding's own spring angle.
When to use: Cutting crown molding (or any angled trim) that meets the wall at a spring angle other than flat.
Steps
Enter the Spring Angle (defaults to 38°, a common crown molding spring angle).
Enter the Corner Angle (90° for a standard square corner).
Press Calculate for the Miter Angle and Bevel Angle to set your saw to.
Examples
Standard 38° crown on a normal 90° corner: Calculate gives the exact miter and bevel angles to dial in on a compound miter saw.
Tips
Both angles are visible and editable at the same time here, unlike the keypad's own Comp/Miter key, which enters the corner angle and cycles through a stored spring angle.
Arc (Advanced)
Arc (Advanced)
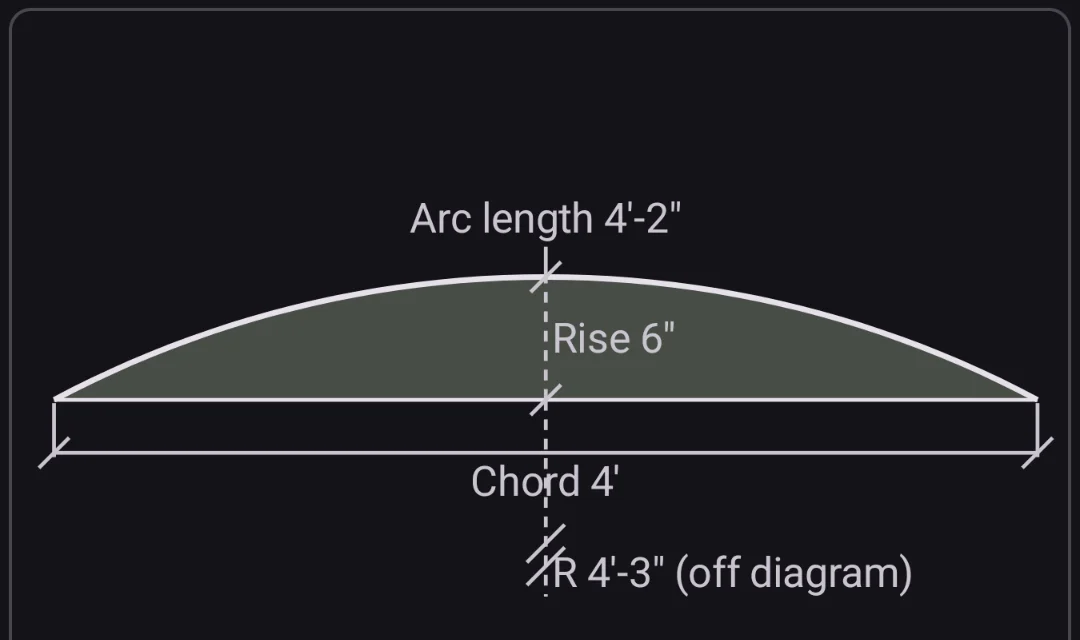
What it does: Solves an arched opening or circle segment from any 2 of chord, rise (sagitta), radius, or angle, then gives the full geometry: radius, angle, arc length, chord, segment area, pie slice area, and rise.
When to use: Framing an arched window or door opening, or laying out a curved feature.
Steps
Enter any 2 of Chord, Rise, Radius, Angle — leave the other 2 blank.
Review the solved radius, angle, arc length, chord, segment area, pie slice area, and rise.
Enter an On-center spacing and optional Base for arched wall stud lengths (see its own section).
Examples
An arched window 48" wide with a 6" rise: entering Chord 48" and Rise 6" solves for the radius, the included angle, and the arc length of the curve you need to cut.
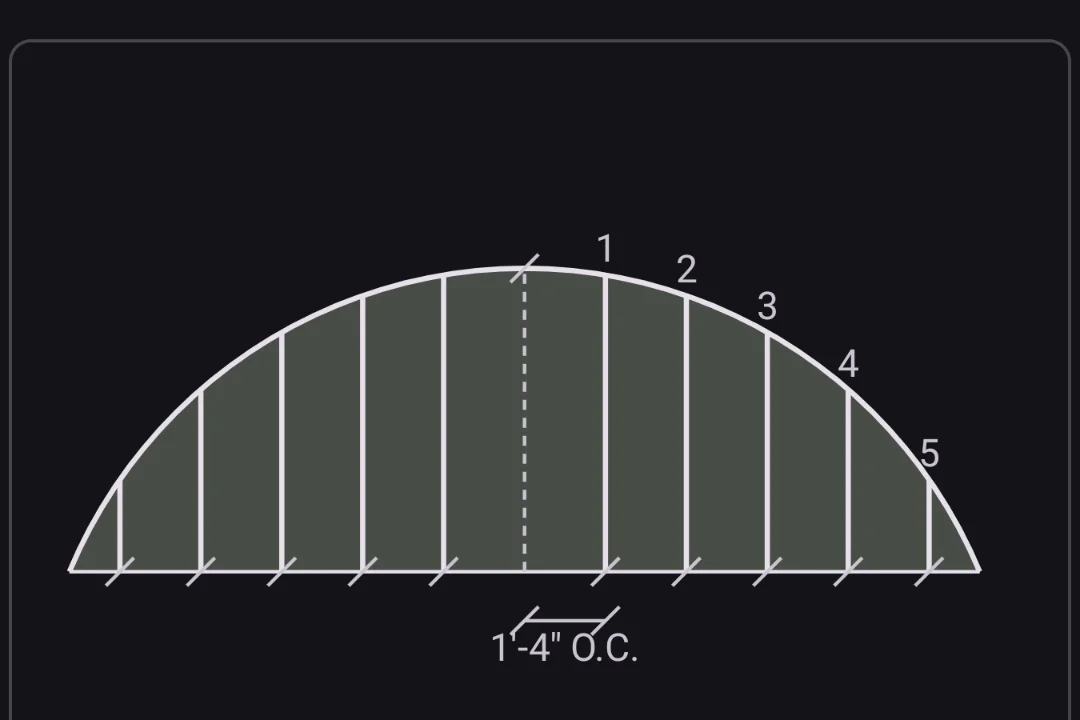
What it does: Calculates the graduating stud lengths needed to frame a curved (arched) top plate — shown for both Inside and Outside framing at once, plus an optional Base for a short flat wall section below the arch.
When to use: Framing an arched opening's curved top — cripple studs under a curved header, either rising from the sill (Inside) or hanging from a flat top plate (Outside).
Steps
Solve the arc itself first (any 2 of Chord/Rise/Radius/Angle).
Enter the on-center spacing for the studs.
Optionally enter a Base — a short flat wall section the arch sits on top of.
Read both the Inside and Outside stud lists and diagrams.
Examples
A 15' chord, 5' rise arch at 16" on-center: the Inside list gives each stud's length rising from the springline up to the curve; the Outside list gives the same curve framed from a flat top plate instead.
Tips
Inside studs rise from the true floor up to the curve; a Base extends them further down through a kneewall.
Outside studs hang from a flat plate down to the curve; a Base for Outside instead raises that plate higher above the crown — the Base dimension is drawn going up, not down, for Outside framing.
The keypad's own Arc key opens this screen directly — both Inside and Outside are always shown here, side by side.
What it does: Solves an equal-sided (regular) polygon's full layout — full angle, bisect angle, side length, perimeter, and area — from the number of sides and any one known dimension (radius, side length, or perimeter).
When to use: Laying out a gazebo, an octagonal deck, or wrapping trim around a column — any regular-polygon shape.
Steps
Enter the Number of sides.
Choose which dimension you know: Radius (center to corner), Side length, or Perimeter.
Enter that value.
Read the Full angle, Bi-sect angle, Side length, Perimeter, and Area.
Examples
An 8-sided gazebo with a 6' radius: entering Sides 8 and Radius 6' gives every corner angle to cut, plus the exact side length and total deck area.
Tips
Full angle is the interior angle at each corner; Bi-sect angle is half of that — the angle to set a miter saw to for two pieces meeting at that corner.
What it does: Solves the classic pipefitter's offset problem: given how far a pipe needs to jog sideways to clear an obstacle (the Offset) and the fitting angle you're using at each elbow, finds the Travel (the diagonal, center-to-center length between the two fittings) and the Run (how much straight-line distance the jog costs along the original pipe direction). It then automatically looks up how deep that fitting's socket is from a built-in fitting database and subtracts that from each end, so the Pipe Cut Length shown is the actual length to cut — not the theoretical center-to-center distance.
When to use: Any time a pipe run has to step around a beam, duct, another pipe, or any other obstacle using two matching fittings (two 45s, two 22.5s, etc.) and you need to know how much pipe to cut for the diagonal section.
Steps
Enter the Offset — the perpendicular distance the pipe needs to move.
For a rolling offset — the pipe needs to jog sideways AND up/down at once, e.g. around a duct crossing at an angle — also enter Roll, the vertical distance. The Offset field relabels itself "Set" once Roll has a value. Leave Roll blank for an ordinary flat offset.
Tap a standard fitting angle (11.25°, 22.5°, 30°, 45°, or 60°), or type a custom angle directly into the Fitting Angle field.
Choose the Pipe Material, then the Pipe Size (only sizes that material actually comes in are offered), then the Fitting Type. Only fittings that can actually form a matched-pair offset are listed — "22.5°", "45°", "Street 45°" — since 90°-family fittings ("90°", "Long Sweep 90°", "Street 90°") and branch fittings (Sanitary Tee, Wye, Combination Wye & 45°) don't have a Travel/Run relationship at all: two 90° elbows never bring a pipe back parallel no matter how far apart they are, and a tee/wye joins a branch line rather than jogging around an obstacle. Picking a Fitting Type here always updates the Fitting Angle field to match it, so the two can never disagree.
Leave "Use Standard Fitting Database" checked to pull the socket insertion depth automatically, or uncheck it to type in your own depth — useful when your actual fittings are a specific manufacturer's part that differs from the generic reference value.
Press Calculate. Geometry shows Offset/Angle/Travel (or, for a rolling offset, Set/Roll/True Offset/Rolling Angle/Angle/Travel); Fitting Information shows what was selected and its Socket Insertion Depth; Cut List shows the actual Pipe Cut Length to mark and cut.
Examples
A 6" offset around a beam using two 45° elbows needs a Travel of about 8-1/2" center-to-center; on 3" PVC DWV (about 1-9/16" socket depth per side), the actual Pipe Cut Length comes out closer to 5-3/8" once both socket ends are subtracted.
The same 6" offset using two 22.5° elbows (a gentler bend, common on drain lines to preserve flow) needs a longer travel piece — about 15-11/16" — but only costs about 14-1/2" of run.
A rolling offset with a 6" Set and an 8" Roll combines into a 10" True Offset (the classic 6-8-10 right triangle) and a 53.13° Rolling Angle — mark the fitting that many degrees off level before cutting so it lands correctly oriented in 3D. From there, Travel/Run/Cut Length work exactly like a flat 10" offset.
Tips
The steeper the fitting angle, the more travel pipe (and less run) the offset costs — 60° elbows use less run but more pipe than 45s; 22.5s use more run but less pipe than 45s.
The fitting database's values are generic reference figures, not any one manufacturer's spec sheet — every result's Cut List section shows a short note saying so. Measure and verify before cutting, especially on Cast Iron (most modern installs use no-hub banded couplings, not a socket at all).
Rolling Angle tells you how far to rotate the fitting off level when marking it — it's not the fitting angle itself (11.25°/22.5°/30°/45°/60°), which still controls Travel and Run the same way it does for a flat offset.
What it does: Converts between units in nine categories — Volume, Area, Weight/Mass, Length, Temperature, Pressure, Rebar, Speed, and Angle — with every unit in a category live-syncing off whatever was last typed into any of them.
When to use: Converting a measurement, spec, or gauge reading into a different unit — a supplier quote in liters, a pressure rating in kPa, a rebar callout by diameter instead of bar number.
Steps
Pick a Category from the top dropdown.
Two fields show by default, each with its own Unit dropdown — pick which units those two slots show.
Type a value into any field; every other visible field updates immediately.
Picking a unit already shown in the other field swaps the two instead of duplicating it.
Press "Show All" to reveal every unit in the category at once (still all live-syncing off the same value); press it again to collapse back to two fields.
Rebar is a special case — it always shows all five fields (Bar Number, Diameter, Weight per Foot, Weight per Meter, Cross-sectional Area) and has no unit picker, since real rebar only comes in sizes #3–#9: any value typed snaps to the nearest real size.
Examples
5 Gallons in the Volume category shows 18.92706 Liters in the other field.
Typing 4 into Rebar's Diameter field snaps to #4 rebar (closest real size) and shows 0.668 lb/ft, 0.994 kg/m, and 0.1963 sq in.
A 4:12 roof pitch: type 4 into Angle's "Inches per Foot (X:12 pitch)" field to see it's about 18.43°, or 33.33% slope with Show All open.
Tips
"Inches per Foot (X:12 pitch)" is the same number roofers mean by a "4:12" pitch — there's no separate Rise:Run field, since they'd always show the exact same value.
Switching Category always starts that category's fields fresh — nothing carries over between categories.
What it does: Converts between a measurement taken directly off a scaled drawing and the real-world size it represents, in either direction, at any standard architectural, engineering, or metric ratio scale — or a scale you define yourself.
When to use: Reading a size off a print with a ruler, or checking what a known real-world dimension should measure on the page at a given scale.
Steps
Pick a Scale from the dropdown — Architectural (e.g. 1/4" = 1'-0"), Engineering (e.g. 1" = 20'), or Metric ratio (e.g. 1:100).
Or pick "Custom…" and define your own scale by example: enter a drawing reference and the actual size it represents (e.g. 1" and 15').
Type a value into either "On the Drawing" or "Actual Size" — the other updates immediately.
Switching the Scale afterward re-interprets whatever's already entered under the new scale instead of clearing it, so you can compare the same drawing measurement across scales without retyping.
Examples
2" on the Drawing at 1/4" = 1'-0" shows 8' Actual Size.
50' Actual Size at 1" = 50' (engineering) shows 1" on the Drawing.
A Custom scale of 1" = 15' turns 3" on the Drawing into 45' Actual Size.
Tips
Switching scales keeps whatever's in "On the Drawing" and just recalculates "Actual Size" — handy for comparing how the same measurement reads at a couple of different scales.
Both fields accept feet-inch-fraction entry (e.g. "2-1/2"", "10'-6"") the same way every other measurement field in this app does.
What it does: Every adjustable default and display format in the app, in one list — fraction rounding, unit displays, framing defaults, and app-specific audio/haptic feedback.
When to use: Setting up the app to match your own local code, preferred units, or working style once, instead of re-adjusting every calculation.
Steps
Open Preferences via Func then Store, or the ⋮ menu.
Use − and + next to any setting to step it.
Changes take effect immediately and are remembered across restarts.
Tips
Every setting listed here except the three audio/haptic ones at the bottom also has its own Clear All reset back to its factory default.
Fractional Resolution
What it does: Sets the smallest fraction every dimension rounds to when displayed — cycles 1/2 → 1/4 → 1/8 → 1/16 → 1/32 → 1/64 and back.
When to use: Working to finer or coarser precision than the 1/16" default — 1/32" or 1/64" for fine trim work, 1/4" or 1/2" for rough framing.
Tips
Factory default: 1/16".
Fractional Mode
What it does: STANDARD reduces a fraction to its simplest form (4/16" displays as 1/4"); CONSTANT keeps it over the full Fractional Resolution denominator (4/16" stays 4/16").
When to use: CONSTANT is useful if you're marking a tape or story pole in one fixed denominator throughout, so every measurement reads in the same units.
Tips
Factory default: STANDARD.
Meter Linear Display
What it does: FIXED always shows a plain linear meter value to 3 decimal places; FLOAT trims trailing zeros like any other plain number.
When to use: Metric work where a consistent 3-decimal display matters, versus a cleaner trimmed display.
Tips
Only affects a bare linear meter value, not square/cubic meters. Factory default: FIXED.
Decimal Degree Display
What it does: FIXED always shows every angle in the app to 2 decimal places; FLOAT trims trailing zeros.
When to use: Consistent-precision angle output across Hip/V, Comp/Miter, Arc, and Roofing.
Tips
Factory default: FIXED.
Stud On-Center Spacing
What it does: The default on-center spacing used by the Studs key (Func+4) and the arched wall stud lists on the Arc (Advanced) screen's keypad cycle.
When to use: Framing at 24" on-center instead of the 16" factory default.
What it does: ON allows a very large or very small plain-number result to display in scientific notation; OFF always expands it back to plain decimal digits.
When to use: Rarely needed for everyday construction math — everyday angles, counts, and dimensions never approach a magnitude where this matters.
Tips
Factory default: OFF.
Voice Input Confirmation Chime
What it does: Plays a short chime whenever a spoken voice command is understood and applied.
When to use: Turn off if you'd rather rely on the visible key-press pulse alone.